Going with MVVM on Android via Data Binding

IT copywriter
Reading time:
When it comes to the development of complex UI solutions in Android apps, you have to write lots of boilerplate code. For example, when a user enters or receives any data, some View can change their parameters: text, visibility, enable, etc. With complex logic a fragment or activity code gets many setters: setEnabled(), setVisibility(), setText(), etc. These actions increase the size of the code and lead to more bugs in software as a result.
Fortunately, Google has launched the Data Binding library that helps solve the problem of increasing code, makes the code more convenient and readable, and even lets you avoid a large amount of the boilerplate. The library allows binding data structures to the layout, looking for their changes and then displaying them in XML attributes.
Of course Data Binding isn’t the first library for binding. However Data Binding differs from similar libraries (Bindroid, RoboBinding, ngAndroid) with the following features:
- As the official Google library, Data Binding doesn’t have any limitations for use with AppCompat, RecyclerView, and other Android components.
- The error test can be run during the compiling stage.
- Allows you to generate code, instead of working with reflection.
The library has some drawbacks, but they are insignificant. Let’s consider how we can implement the Model View ViewModel (MVVM) pattern on Android using Data Binding.
The Challenge
Using the traditional development approach, data, logic and presentation are not separated. They are located in fragment or activity code. The traditional approach is inconvenient for developing apps with complex extensional logic for the same reasons as for developing complex UI solutions: more code means mixing logic with presentations and leading to more bugs.
The Solution
For solving the problem, we can implement the MVVM pattern via Data Binding, which provides an opportunity to separate data, logic and presentation.
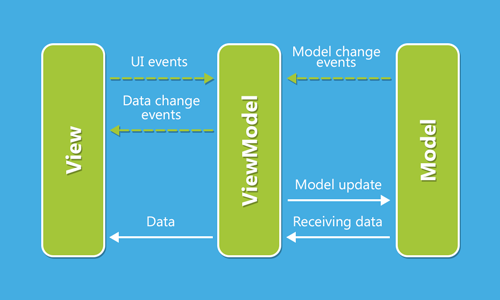
The Pattern MVVM Scheme

The key idea behind this implies that using Data Binding, you can bind the ViewModel object to the layout, execute the specific moments of fragment/activity interaction through the interface (for example, a change of fragment or activity) and describe the logic in ViewModel. In other words, our ViewModel serves as an interlayer between Model and View. Thus we get a flexible distributed system, where every element plays a particular role and doesn’t interfere with others.
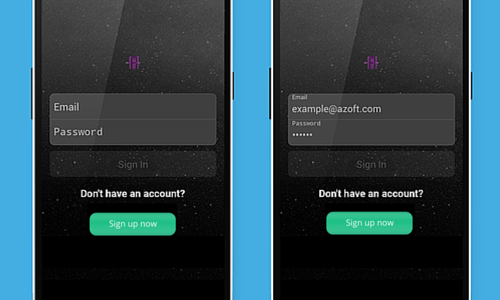
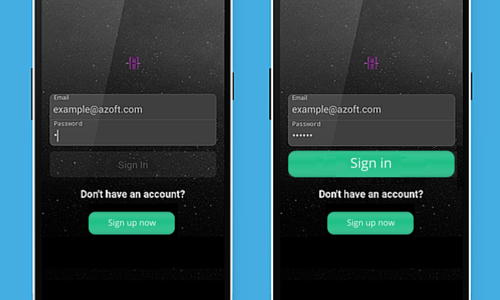
Let’s consider this approach with the help of the authorization screen.


As you can see on the screen the button Sign in only becomes enabled when both fields of EditText are entered correctly (for the email — the check of email pattern; for the password — the character quantity is larger than 3). We can implement this with the help of the MVVM pattern.
The ViewModel Code:
public class SignInViewModel {
 public SignInRequest signInRequest;
 private SignInDataListener mDataListener;
 public SignInViewModel(@NonNull final SignInDataListener signInDataListener) {
 mDataListener = signInDataListener;
 signInRequest = new SignInRequest("", "");
 }
 public TrimmedTextWatcher getEmailTextWatcher() {
 return new TrimmedTextWatcher() {
 @Override
 public void afterTextChanged(@NonNull final Editable editable) {
 signInRequest.setEmail(editable.toString());
 }
 };
 }
 public TrimmedTextWatcher getPasswordTextWatcher() {
 return new TrimmedTextWatcher() {
 @Override
 public void afterTextChanged(@NonNull final Editable editable) {
 signInRequest.setPassword(editable.toString());
 }
 };
 }
 public boolean onEditorAction(@NonNull final TextView textView, final int actionId,
 @Nullable final KeyEvent keyEvent) {
 if (TextUtils.editorActionBaseCheck(textView, actionId, keyEvent) && signInRequest.isInputDataValid()) {
 requestSignIn();
 }
 return false;
 }
 public void onSignInClick(@NonNull final View view) {
 requestSignIn();
 }
 private void requestSignIn() {
 // Here we trying to sign in and after open MainActivity
 mDataListener.onSignInCompleted();
 }
 public void onSignUpClick(@NonNull final View view) {
 mDataListener.onSignUpClicked();
 }
 public interface SignInDataListener {
 void onSignInCompleted();
 void onSignUpClicked();
 }
 public class SignInRequest extends BaseObservable {
 @NonNull
 private String mEmail;
 @NonNull
 private String mPassword;
 public SignInRequest(@NonNull final String email, @NonNull final String password) {
 mEmail = email;
 mPassword = password;
 }
 @NonNull
 public String getEmail() {
 return mEmail;
 }
 public void setEmail(@NonNull final String email) {
 mEmail = email;
 notifyChange();
 }
 @NonNull
 public String getPassword() {
 return mPassword;
 }
 public void setPassword(@NonNull final String password) {
 mPassword = password;
 notifyChange();
 }
 public boolean isInputDataValid() {
 return TextUtils.isEmailValid(getEmail()) && getPassword().length() > 2;
 }
 }
}
In the ViewModel we create two methods, one for returning two TextWatchers and a second for processing the pressing of the button Done on a keyboard. We then describe the interface SignInDataListener for the connection with SignInFragment in SignInViewModel. We perform the interface implementation in the constructor SignInViewModel.
All the processing and logic testing of the entered data for validity is done in the SingInRequest class that is inherited from BaseObservable. There are also two methods for listening if the user clicks the buttons Sign in and Sign up. For the Sign up button, we simply call the method implemented interface onSignUpClicked. For the Sign in button, we first send a request, then do the processing. And if everything goes right we use the method of the implemented interface onSignUpClicked. If problems appear, then we handle them. Therefore, all logic and magic takes place in the ViewModel.
Let’s look at how this is connected with our layout:
<layout xmlns:android="http://schemas.android.com/apk/res/android">
 <data>
 <variable
 name="viewModel"
 type="com.azoft.mvvm.SignInViewModel"/>
 </data>
 <LinearLayout
 android:layout_width="match_parent"
 android:layout_height="match_parent"
 android:orientation="vertical">
 <EditText
 style="@style/EditTextEmail"
 android:addTextChangedListener="@{viewModel.getEmailTextWatcher}"
 android:onEditorAction="@{viewModel.onEditorAction}"/>
 <EditText
 style="@style/EditTextPassword"
 android:addTextChangedListener="@{viewModel.getPasswordTextWatcher}"
 android:onEditorAction="@{viewModel.onEditorAction}"/>
 <Button
 style="@style/ButtonSignIn"
 android:enabled="@{viewModel.signInRequest.isInputDataValid}"
 android:onClick="@{viewModel.onSignInClick}"/>
 <Button
 style="@style/ButtonSignUp"
 android:onClick="@{viewModel.onSignUpClick}"/>
 </LinearLayout>
</layout>
We pass our ViewModel in the variable tag using the parameters name=”viewModel”, type=”com.azoft.mvvm.SignInViewModel”. Then we set the relevant parameter TextWatcher and EditorAction for all the EditText. For the buttons, we set the relevant listeners, and we set the parameter enabled for the Sign in button. The parameter enabled depends on the method isInputDataValid of the class SignInRequest. This method always returns the latest data of entered field validity because the SignInRequest is inherited from BaseObservable. And when setting the fields in the setters, we call the notifyChange() method with information about data change.
The View and ViewModel Relationship
public class SignInFragment extends Fragment implements SignInViewModel.SignInDataListener {
   @Override
 public View onCreateView(final LayoutInflater inflater, final ViewGroup container,
 final Bundle savedInstanceState) {
 final View layout = inflater.inflate(R.layout.fragment_sign_in, container, false);
 FragmentSignInBinding.bind(layout)
 .setViewModel(new SignInViewModel(this));
 return layout;
 }
 @Override
 public void onSignInCompleted() {
 // Start main screen
 }
 @Override
 public void onSignUpClicked() {
 // Start sign up screen
 }
}
We bind our layout to the SignInFragment in the automatically generated class FragmentSignInBinding and move the SignInViewModel there. Fragment implements the interface which is defined in ViewModel. In our case, the interface is SignInDataListener. By doing this we define what is going to happen in View after a successful authorization or if the Sign Up button is pressed. Thus, View (Fragment, in this case) knows nothing about what happens when pressing a button or entering data. We only inform View how it should be changed or renewed.
Of course we must remember that we need to save the ViewModel state and bind SignInFragment with the lifecycle. This is omitted from the code above to prevent clutter.
As a result of this we get a distributed system with logic and presentation separated. This system is very convenient because a large part of the logic in ViewModel is often the same in different apps and can be repeated within one project. Generally speaking, we can use a big chunk of the ViewModel code in the development of any Android app, even though the View is unique for every app.
To learn more about this topic, you can have a look at these app samples: https://github.com/ivacf/archi. Here you can find visual examples of work done with the search and list screen.
Conclusions
Advantages of an implemented approach are:
- It’s very convenient for complex screens with complicated logic and UI.
- You get the opportunity to use all the benefits of the Data Binding library (ObservableFields, no need to call findViewById or apply Butterknife or similar libraries, Binding adapters etc.).
- It’s significantly easier to write tests as you separate logic and presentation.
Disadvantages of the approach are:
- You need to save the ViewModel state.
- It isn’t always possible to separate logic and presentation.
In summary, all I can say is that my impression of using this approach is very positive. I find implementing MVVM via Data Binding is a very convenient way to create Android apps. Even the problems of saving the ViewModel state and binding the lifecycle to fragment/activity can be solved. Using the described approach, you can easy develop apps with a rich interface and at the same time, get a simple and compact ViewModel.


Comments