Mobile App Development Process: a Seven-Act Play of Creating an Application

Head of Mobile Development
Reading time: 24 min
Did you know that there are around 3.48 million mobile apps on the Google Play Store and that almost 88.5 thousand apps are released there monthly? The numbers don’t lie, they’re screaming, “Wake up! It’s time to develop a mobile app.” But how do you develop an app you might wonder? Our comprehensive, yet concise, guide through the mobile software development cycle will help you with that.
No matter what you’ve decided to build — an enterprise application or a startup app with a wide audience — we’ll put your fears to rest and describe all the steps to creating an app in detail.
With that said, here’s the seven-act play “Mobile Application Development”
Characters
Client — a business owner who has an app idea;
Project Owner — a person responsible for the project. Probably, but not necessarily a business owner that builds the image of the app;
Stakeholders —all the parties that have an interest in the client and their app idea;
PM — a project manager who controls the development process to achieve the client’s requirements for the project;
Business Analyst — an analytics expert who defines and then prioritizes requirements for a product;
UI/UX Designer — a creator of intuitive and attractive UI;
Developer — an engineer who writes the app code;
QA Engineer — a quality assurance engineer testing the app.
Program
Act #1. Casting or Hiring Developers
Choose an ally and hire an app developer who will help you through the struggles of developing an app. Analyze their strengths and their weaknesses and pick the best one for your project.
Act #2. Audition or Project Kick-Off
In the final moments before the development team sets off you should: outline roles, development milestones, and monitoring methods, establish agreements and sign the papers.
Act #3. Rehearsal or Product Discovery
This act is dedicated to conducting research and strategizing:
- Who are the people who will use your app?
- What are the app’s key features?
- Will there be a marketing campaign for the app?
These are just some questions that you would have to answer before starting the rough journey through the rough waters of app development.
Act #4. Stage Decoration or UI/UX Design
Time to find a unique look for your future app! Visuals for user interfaces, wireframes, and all design-related questions should be resolved by the end of this act.
Act #5. “Light! Camera! Action!” or App Development & Quality Assurance
Action! It’s time for the actual coding, production, testing, refinement, and reviewing. The result of this act is a product, ready to go.
Act #6. Performing or Publishing on App Stores
After it’s finished, release the application to the app stores. In modern times, publishing an app is easier than ever, just make sure to follow store guidelines for swift approval.
Act #7. Touring or Maintenance & Improvement
The journey of app development is never truly finished. When an app is released, there are still many things to do, such as beta-testing, bug fixing, updating and continuously supporting the application.
Prologue
In the beginning, a client comes up with a mobile application idea. We ask the client to give us the technical specification. If there aren’t any technical specifications, we create a developing brief. It helps us prioritize work, as well as identify goals and tasks for future application.
In the software building process, we combine Waterfall and Agile development. In general, developing will be the same for both approaches, the only difference is how you develop an app. The Waterfall model means that the process goes step by step: you create the whole product in a strict sequence. The Agile approach works using iterations regarding specific functionality. Each iteration can include all the stages of the development process and that’s why they’re easy to use simultaneously.
The output:
- mobile app’s basic features
- chosen platform: iOS, Android, or hybrid
- methodology: a combination of Agile and Waterfall
Act #1. Casting or Hiring Developers
Since we’ve already discussed tips and tricks for hiring app developers, we will focus on the three hiring options you have:
- In-house – a team of professionals working exclusively for your company. The benefits of such a team are that each member is hand-picked, you know the exact level of their competence and the communication is more effective between the team members. Downfalls: development costs are higher than other options and it consumes a lot of time that could have been otherwise spent on development.
- Freelance – an individual (or a group of individuals) that provide development services. Their work is usually cheaper than the other two options, but the quality of the result may disappoint you.
- Outsource – a company that specializes in developing software products. This option combines the best of both worlds: the quality of an in-house development team with a lower price.
The output:
- the development team
Act #2. Audition or Project Kick-Off
This act is mostly dedicated to organizational moments. This is when everyone in the team has a meeting and agrees on a future workflow. Roles are defined and confirmed, rules and objectives are established. This is a brief example of how the kick-off meeting may go:
-
- Introduction. The team members are introduced to each other.
- Project overview. PM delivers project goals, purposes, and expected outcomes;
- Roles and responsibilities. PM defines who will be responsible for the development, design, testing strategy, communication with customers, marketing strategy, and more.
- Deadlines and milestones. Timeframes for objectives and overall workflow are discussed.
- Client communication terms. This is where parties establish what, when, and how the product will be delivered to the client.
- Constraints. This part is about the development budget, resources, and tools.
- Project scope and priorities. Define what to focus on and what has a low priority.
- Misc. A period to tie up loose ends. Every party asks questions, clarifies misunderstood moments, and other concerns are addressed as necessary.
Now that all the key points are discussed and everyone agrees on their role, responsibilities, and deadlines, you can begin working on development.
The output:
- organized teamwork
Act #3. Rehearsal or Product Discovery
The mobile app development process doesn’t always include an analytics stage. Sometimes clients do a business analysis with their resources or come to the software development company with ready-made project requirement specifications. Those clients who go through the analytics stage with their software development partner win more — collaborative analysis helps both sides stay on the same page concerning the project vision. We thoroughly estimate the required work and get a detailed budget.
1. Define your target audience and product purpose
At the start of this act, you have an idea for an application. The goal of this step is to get an idea of what your future customers will look like through research:
- Who are they?
- Where are they from?
- What are their age and gender?
- What is their income?
- Do they use apps for iOS and Android?
- What problem do they share that your application will solve for them?
- How will your application solve this problem?
Answering those questions will help you turn your idea into an established app concept.
2. Conduct market research
Every masterpiece requires a significant amount of reference material. Now that your product has a goal to achieve, see what related products there are in the app stores, what’s popular, what’s considered vital functionality. Examine the market closely, learn from rivals, think about how you can improve existing solutions, what new features you can add to make your app stand out.
At this point, you may also reconsider and review your original ideas using the research data, weed out unsuitable ideas, and pick up some ideas inspired by your competitors.
3. Agree on a project scope
After completing market research and reviewing old ideas:
- Establish business requirements;
- Decide on what problems your app is going to solve;
- What kind of app are you going to build;
- Will the application be monetized;
- Are you going to cover one or multiple platforms;
- What would be the estimated cost for the development?
Resolving the problems above, you will establish your project’s scope.
4. Establish requirements
Time to put collected and approved data into functional requirements (what the application will do), non-functional requirements (how the application will do that), and the overall scope of the MVP (minimal viable product) for your project. Ideally, all the specifications may be transformed into software requirements specification documents. Note that, at this stage, only technical details, the barebones of an app building, are discussed. We will discuss visual components in later acts.
5. Chart the roadmap
A roadmap for a project is a strategic communication document that defines important milestones, desirable goals, and timeframes for said goals as well as milestones to be met. Define objectives and split them into steps that the development team will take to achieve them. Through the roadmap, you will communicate to the team how all the ideas, features, and details will turn into a product.
The output:
- software requirements specification (functional and non-functional requirements)
- project plan
- detailed project costs
Act #4. Stage Decoration or UI/UX Design
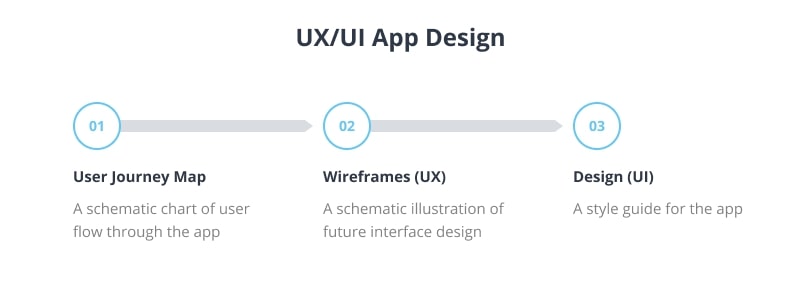
User interface (UI) design refers to the aesthetic elements that users interact with, such as buttons, icons, menu bars, typography, colors, and more. User experience (UX) design refers to the experience a user has when interacting with a product. Both parameters are very important in the process of developing mobile software of any type.
Sometimes clients reach out to us with a ready-made design for a project. If a client doesn’t have an app design, we make the UI/UX design from scratch. Let’s discuss the general elements of a designer’s work.
User Journey Map
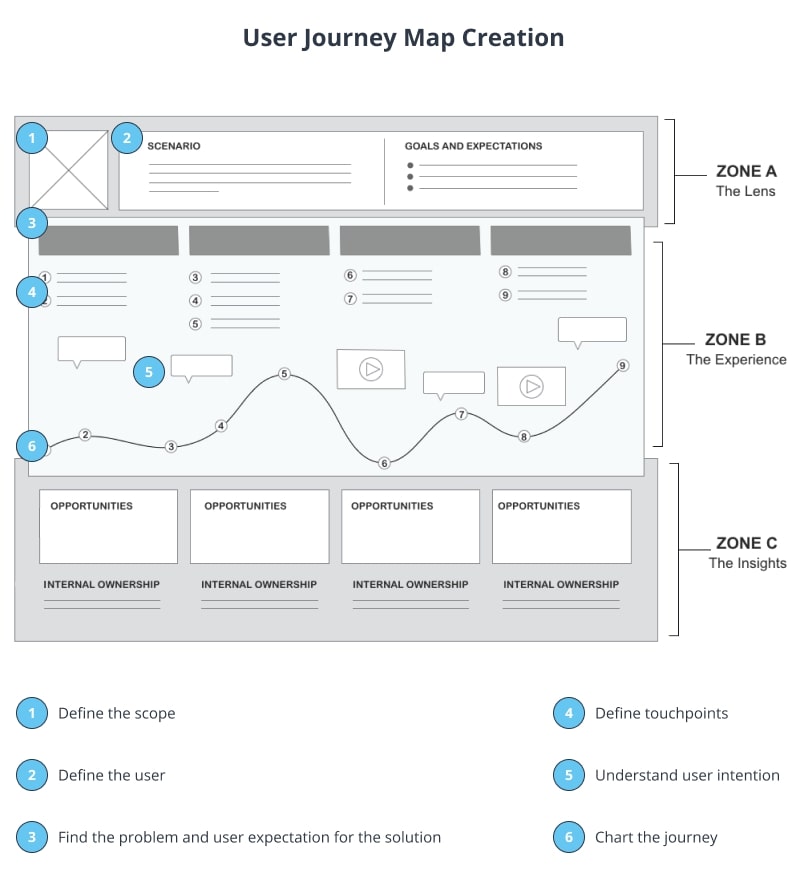
The user journey map is a schematic chart that explains user flow through your product. It helps designers understand the product from the user’s point of view. It’s usually presented as a timeline of touchpoints between the user and the product.
To create a useful user journey map, you need to:
- Define the user journey map’s scope. Would this be a detailed map of every outcome possible? Maybe it focused on a single feature? Is it simple and schematic?
- Define the user. Pick one of the users that you have already researched in Act 3. This user will be the main actor of the journey map.
- Find the problem and understand the user’s expectations for the solution. For example, users want to order a pizza and get it delivered within 45 minutes.
- Define touchpoints. Further developing our previous example, the touchpoints might be “choose pizza,” “enter a delivery address,” “apply discount coupon.”
- Understand the user’s intentions. What is user motivation? Why did they choose to interact with your application? For pizza delivery, the intention would be simple — to get a meal, but intentions may be more complex, like “learn a language.”. This step also includes actions that the user would take, their emotional state using your product, and the challenges that they might encounter along the way.
- Chart the journey. Apply all the information collected to create a user journey map, step-by-step.
Wireframes
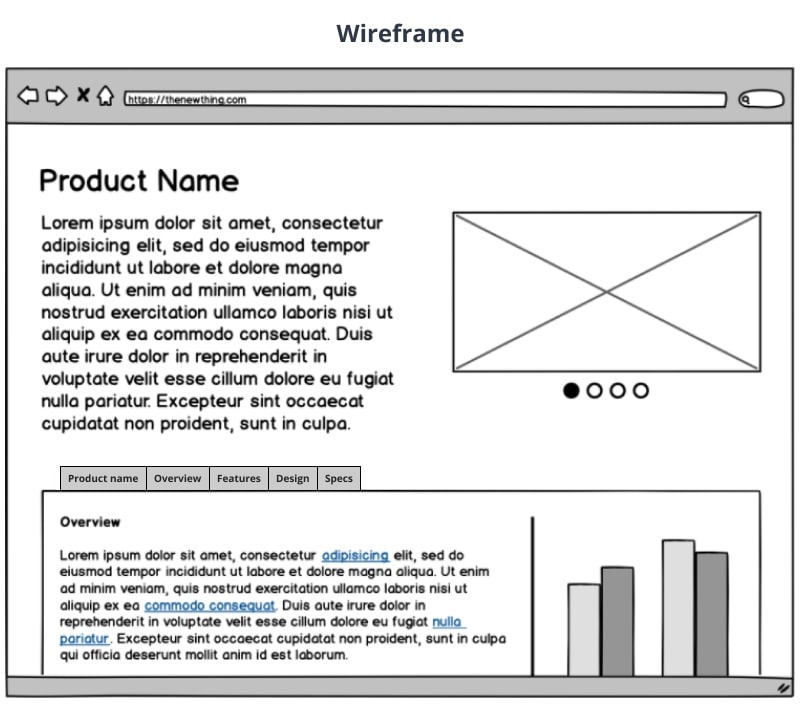
Wireframes are schematic illustrations of future user interface design. They include blocks, modules, relationships, and the interactions between them. Wireframes are the building blocks of design guidelines. They’re focused on space and content allocation, as well as functionality and behavior rather than style or graphics.
Wireframes allow the client and the development team to look at the product while there is no code written yet. They are easier to review and edit than code. They also help you imagine how the same product will look on different mobile devices.
When a business analyst gives wireframes to the designer, we move to the stage of visualization. We make a ScreenFlow, the important design elements such as logos, fonts, colors, and a detailed prototype including possible use cases. The designer and the analyst work together throughout this stage.
Design
The designing stage defines a style guide for your app, the looks of it, and the user interface.
During the design stage, a UX/UI designer prepares a static prototype and, if clients request it, an interactive prototype of the app. By creating these prototypes, we demonstrate how the app will look, and what behavior it will display. Naturally, these things depend on the specific tasks and the client’s needs.
While the design is being created, the app gets the blueprints and visual direction required for the front-end developers. It’s essential to get feedback from the business analyst and the client at the end of this stage to ensure that the design completely satisfies the initial requirements.
The output:
- ScreenFlow
- app design
- attractive UI and comfortable UX
Act #5. “Lights! Camera! Action!” or App Development & Quality Assurance
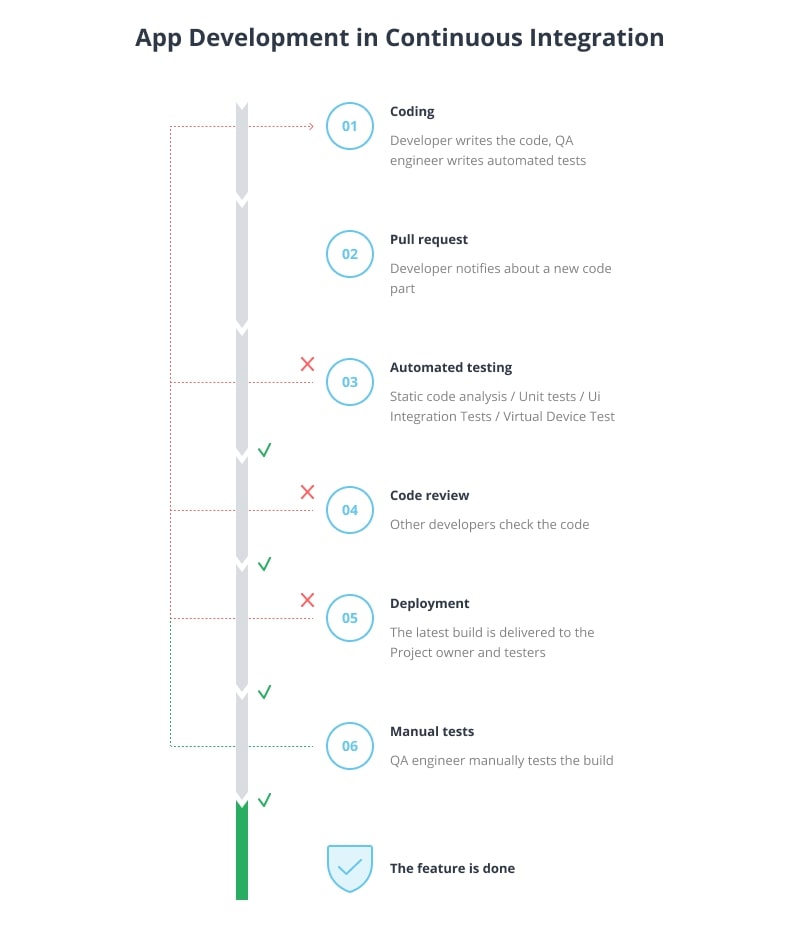
When the app has a detailed requirement specification, design, and prototype, the application development process starts. A development team writes code to implement all the required features and links the app logic to the server-side. We also translate the app design into code by writing all the styles and elements of the UI.
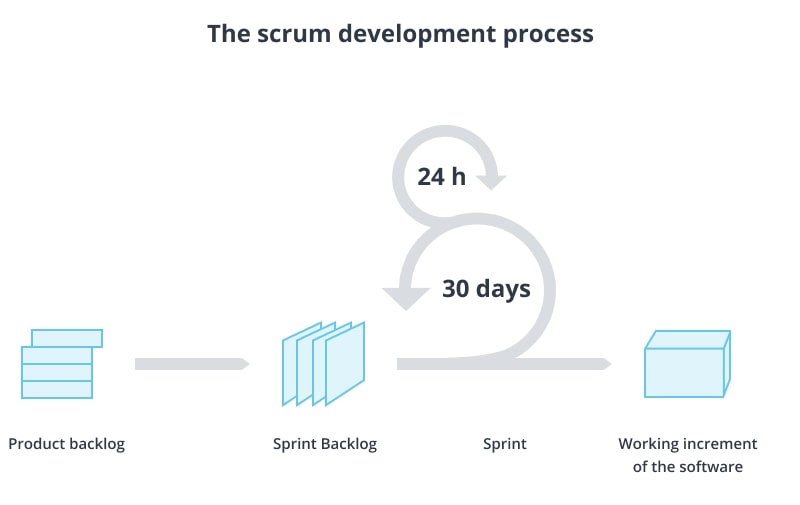
The application creating process may be split into basic units called “Sprints” — the fixed periods of time between a week and a month in which developers code. Before the sprint begins, it requires a bit of planning:
- The team agrees on a goal and composes a document containing their expectations on what they will deliver to the client by the end of the sprint;
- Select product backlog items contributing to the goal;
- Compose a sprint backlog depending on items that will be worked on during the sprint.
It is not only the developers who are involved in sprint planning, you, as the project owner and project manager, may also participate to know exactly what to expect by the end of a sprint.
2. Code
Now it’s time to work on the code. Developers work on goals and features established during sprint planning and QA engineers design future testing phases.
To develop native mobile apps, we apply Java and Kotlin for Android, Objective-C, and Swift for iOS, and modern mobile frameworks and libraries. For cross-platform development, we use React Native and NativeScript. As soon as part of the functionality is ready, we test it and continue working on other features.
3. Testing/QA testing
QA engineers are involved in the project from the very beginning. They test as often as possible. Once a functional unit is completed, QA engineers do regular tests to guarantee the high quality of the app as critical bugs can cause you to lose your audience, time, and money. The testing phase includes code reviews, performance testing, functional testing, and more.
Here’s how we handle the process of testing:
- First, we test the technical specs during the project estimation stage.
- Then, we write test documentation along with the development stage and prepare test cases.
- When some features are ready for testing, our QA team is there to do so. We carefully follow all the bugs and put them into a bug-reporting system.
- After the bugs are fixed, we check whether it harms the rest of the functionality.
- Before the app is moved to release, we do acceptance testing: we go through the basic business cases of the app to ensure no more bugs appear and the app meets the requirements.
4. Review
At the end of the sprint, the development team elaborates on the results to project owners and stakeholders. Stakeholders give feedback on completed work, discuss the impact of uncompleted work and provide suggestions for upcoming work. Project owners review and refine the product backlog in agreement with stakeholders.
After the reviewing process is done, the developers may send you:
- A demo build of a project;
- Detailed documentation on completed work;
- Notes on challenges they encountered and the extra work completed, planned or otherwise;
- Notes on work hours spent on the project during the sprint.
The project owner doesn’t need to participate in the review meeting, they can just receive the materials afterward.
5. Assessment
After the sprint review, the team has another meeting to review the work process of the last sprint. The team answers the following questions:
- What went well?
- What didn’t go well?
- How can we improve our next sprint?
Ideally, by the end of the sprint retrospective, the team has ideas on what to do differently next time and how these changes might help to improve the product’s quality.
The application development lifecycle consists of multiple repetitions of the steps mentioned above. These steps are repeated until we arrive at the final product.
The output:
- working prototype
- completed product
Act #6. Performance or Publishing on App Stores
Finally, we’ve created a complete product and we’re ready to take on the market! When the tests and updates are finished, it’s time to submit the app to the app stores — App Store, Google Play, and any other designated service the client wishes to use.
Generally, you need to optimize your application for different stores. This includes picking an icon, app name, description, screenshots, banners, and videos showcasing your app features, all the things that will go to the product page and attract users. Stores also require you to pay fees: one-time $25 fee for Google Play (Google Play Developer account) and an annual $99 fee for App Store (Apple iTunes Developer account). We have already described how to optimize apps for the stores in detail, so let’s briefly summarise this to avoid repetition.
Google Play Store
First, you need to create your app through Play Console and set it up: select a default language, specify if it is an app or a game, free or paid, acknowledge “Developer program policy” and accept the Terms of Service (ToS). Then, you need to manage the apk for your application: set it as draft or active. Finally, you set up the store page for your app with the information we described above. After this is done, you can send it for review. The review is usually done in a few hours.
App Store
For AppStore, it’s recommended to download and test your application on the latest OS releases. If everything is in order, the steps are similar to the Play Store. Submit information about your app to the product page, add legal information and upload your app with Xcode for review. The App Store has a strict policy on applications, but they review them in a short period of time.
The output:
- application published to store
Act #7. Touring or Maintenance & Improvement
The story doesn’t end after a successful launch. If the client finds some bugs, when the app is released, we fix them during one year of support. If the first user feedback brings changes, there are two options for further cooperation: to sign a support contract or to start a new development phase including new data.
Epilogue
Building a successful mobile application isn’t simple. There is no “Get Rich Quick Scheme.” Many stages can be mixed or be completed in parallel with each other. If you’re considering participating in app development, choose a trustworthy, technical partner, contact us at info@azoft.com and we’ll help you turn your idea into an app.
Description: Before you start building an app, learn about the development process from our extensive guide.



Comments