How to Build an Android-Powered Arduino Robot

IT copywriter
Reading time:
If your robot does nothing but move around, it may not require sophisticated software at all. However, as its functionality becomes complicated, e.g. moving after recognizable objects, the robot CPU may not be able to cope with the task.
As an experiment we built android-powered arduino robot. Our results show that it works upon following conditions:
- Performance is not critical.
- Task focus is narrow enough.
In this article, we’ll describe how to build and program android-powered Arduino robot which can recognize a human or any other target (using shape and color) and follow the target. Look down the end of article for performance tests using various Android devices by HTC, Huawei and Samsung.
Disclaimer: We only used a few devices at hand. It may be possible that performance and multitasking problems will be of little or no concern if better hardware is used.
The procedure
Building the robot
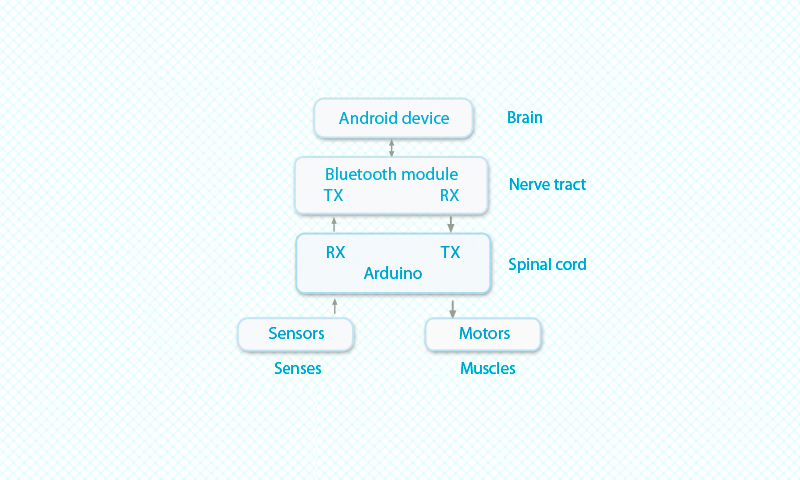
To assemble an Android-controlled robot which can recognize targets and follow them, make sure you have:
- Android device with specially written software
- Arduino to minimize soldering
- Bluetooth board
- Sensors
- Motors

Image 1. Project architecture

Image 2. Components connection diagram
Software
The software part includes an Android application and Arduino firmware.
Android application
Android application modules
- MainActivity — choosing robot control mode.
- ActivityCamera — choosing target identification mode; calculating wheel movement speeds.
- ColorBlobDetector — helper module to look for outlines by color.
- А-device can be used as remote control, which is not very interesting.
- ActivityAccelerometr — polling positioning sensors; calculating wheel movement speeds.
- BluetoothManager — singleton module to communicate with the robot using phone Bluetooth connectivity.
Searching targets
Using computer vision, the robot can recognize a target and follow it. This functionality is implemented with OpenCV, a rich and powerful library for image recognition which has an Android port.
Possible targets may be: a label in the shape of a circle, object of arbitrary color or human (head and shoulders silhouette).
We use the following algorithms to look for the target in a captured image:
- Color detection
- Canny edge detection
- Haar cascades-based classifier
The algorithm returns an array of all detected outlines which is passed down to outline processing algorithm. The result of the latter algorithm is position of target label in a frame if present. Outline processing algorithm consists of the following steps:
- Area and perimeter is calculated for every outline.
- Outlines with area less than 0.25% of frame area are discarded.
- An outline with maximum area is selected among remaining outlines.
Canny edge detection algorithm is used to look circle-like targets.
Haar cascades-based classifier shipped with OpenCV is used to look for human-like targets.
Android application components

Image 3. Android application component diagram
- Android Environment — hardware components and software framework for mobile application development running under Android OS, including camera, display, Bluetooth connectivity and SDK for interfacing with the OS;
- JRE — Java Runtime Environment;
- Android Application — application to control the robot;
- OpenCV — computer vision library;
- UIControllers — user interface event handlers;
- UILayouts — user interface layouts;
- Localization Strings;
- Recognition Components;
- Bluetooth Communication.
Arduino application components

Image 4. Arduino application component diagram
- Arduino Application — Arduino sketch to interact with the Android device and control wheel movement;
- Bluetooth Component;
- Motor Component.
Android and Arduino component interaction
Android and Arduino software communicate over Bluetooth. Android application sends commands to Arduino in the form of a string:
L-155\rR-155\r, (where numbers can be any number from 0 to 255)
L and R characters are prefixes used to tell Arduino which motor is about to change the speed. Next character is either “-” or “+” which specifies whether reverse or forward rotation should be triggered. Carriage return character is used to separate commands for different motors. Any other data is discarded by the receiver.
Conclusion
We tested the algorithms on several Android devices using a static picture. The performance of the algorithms on various devices is summarized in the following table.


Comments